DIY Leather Wrap Watch Bracelet

Fashion watch wraps are super popular and look great on! With these DIY instructions you can have a twist on the regular wrap bracelet and add strands of leather lace look!

What you will need

  • Approximately 36″ of soft, thin, pliable leather
  • Cutting surface (rubber mat)
  • Rotary cutter or box blade
  • Ruler (yard stick works best)
  • Scissors
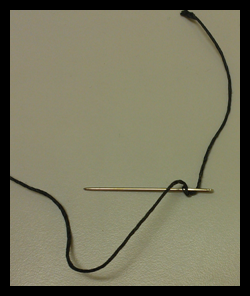
  • Watch face (make sure leather will slide through sides)
  • Snaps & Setter
  • Crystal Rivets & Setter (if desired, other adornments like spots will work too)
  • Spray Adhesive

To begin take your leather and roughly measure how much is needed to go around your wrist three times. Give yourself extra, you can always make it shorter! Take your yard stick and straight edge your leather on both sides. Your width should depend upon how wide your watch face is. If you make it wider than the face there is a chance it won’t lay correctly on your wrist.

Next take your adhesive spray, for this we are using 3m Adhesive Spray. Spray the back of your leather and place on cutting surface. This will allow straight cuts to be made without your leather stretching or sliding around.

IMG_6343Step1

After you have glued your leather to the cutting surface you will then begin to measure where your cuts will be. We measured our cuts every 1/4″. You can always make them bigger or smaller depending on how small you want the strand of leather to be. Just keep in mind the smaller you go the more difficult it is to cut straight. Leave a good inch or two at the end, this is where you will apply your snaps.IMG_6346-1
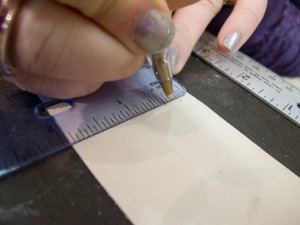
After marking off both ends of your leather take your yard stick and line up marks on both ends. Holding your yard stick down firmly take your rotary cutter, or whatever blade you may have, and cut from one end to the other stopping at the mark. *Make sure your blade is sharp for easy smooth cutting*IMG_6353

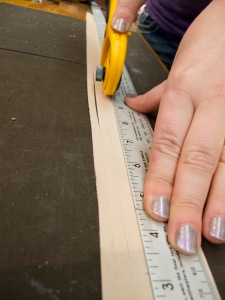
When you have finished cutting all your strips, peel the leather off of the rubber mat. You may have areas where the leather is still attached to itself, do not pull these apart! Take your scissors and cut along the edge, pulling apart will leave edges “fuzzy” from the fibers within the leather.

Pulling leather apart can cause leather fibers to "fuzz" out

Pulling leather apart can cause leather fibers to “fuzz” out

IMG_6358Trim the ends of your bracelet to your liking. When you have finished this you can lay your watch face on top of your bracelet allowing you to see where to place your adornments. For this we chose crystal rivets. Take your hole punch and punch holes where you want them. IMG_6366
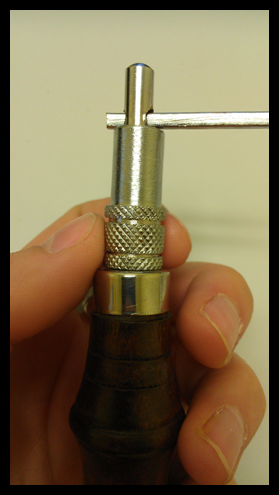
After you have punched your holes take your crystal rivet, crystal side down, and place post through leather putting the cap on and snapping it down. Taking your setter, put the domed end on the cap and give it a few taps! Untitled-1Almost there!! Lastly we need to insert snaps!

(Note: If your watch face will not fit over the snaps you may want to slide it on before attaching the snaps)

Punch a hole in each end of your leather. Since the leather that we used is thinner most snaps will have a post that is too long and will bend over when being set. To fix this problem you can insert a small piece of your leftover leather and create a bumper to allow the snap to set properly. When placing your snaps on the leather make sure that they will match up when you fold over your bracelet and snap properly without a twist in your leather. Set snaps by tapping the center post down on each end, don’t hit them too hard or you will go through them. A few light taps should do the trick!  IMG_6375Place your watch face on the leather, slide it into place and KAPOW! Your finished!!IMG_6388

Posted in How-To | Tagged , , , , , , , , , , , , , , , , , , , , , , , , , , | 1 Comment

DIY Fringe Heels and Boots!

An easy, fun, and CHEAP way to make your pair of heels or boots into the all too popular fringe style!

What you will need:

  • Leather (about 1-1/2 ft per shoe, soft leather lays best and is easier to work with)
  • Glue (contact cement works best)
  • needle
  • thread
  • hooks (similar to bra hooks, for this we are using a size #3)
  • scissors
  • small hole punch

If you have a curved top heel or boot you will need to use more hooks to hold your leather in place.

Curved Top

Curved Top

Straight top

Straight top

Step 1: Make fringe! Fringe can be almost any length or width that you desire. Our fringe is 4″ long with a 1″ top strip, and each strip is about 1/4″ wide. You should allow yourself around 1″ at the top so you have leather to work with when when folding the edge.

Step 2: Measure the length of fringe needed to fit the shoe. Start at the FRONT of the zipper (if you have one, or pick a starting point) and slowly go all the way around your shoe, stopping BEFORE the zipper. You don’t want to overlap the zipper because it causes your fringe to bulge. Make sure when making your cut, you look at the angle of which the leather matches to the zipper and cut accordingly. Many times you will not be cutting a straight line!

Start in front of zipper

Start in front of zipper

Cut accordingly

Cut accordingly

Step 3: Since the leather lays wavy and has a rough edge, you will need to fold the edge over and glue. Use your contact cement and apply a thin layer. You can also use a hammer to make sure your fold is flat and secure.

Rough wavy edges

Rough wavy edges

Add thin layer of glue

Add thin layer of glue

Hammer edges flat

Hammer edges flat

Step 4: You will need to apply the first hook at the edge of your leather. This hook will attach in front of your zipper and acts as your starting point. You will need to punch two small holes and attach the hook with needle and thread.

Punch small holes

Punch small holes

Sew on hook

First hook placement

First hook placement

**make sure to measure how far up or down your hook needs to sit on your leather, too far up will show the hook, and too far down will have an edge of leather sticking up on the side!**

Step 5: Attach hooks as needed to hold the shape of the fringe equal with the shape of the shoe. When you get to the end you may need to cut off extra leather to adjust the size.

Apply hooks as needed

Apply hooks as needed

IMG_6147

You can also get fancy and adorn your leather tops with rivets and crystals!

Add crystals for added flair

Add crystals for added flair

When working with cowboy boots, the length of the fringe and placement can have endless possibilities! You can add to the top with the hooks or you can add to the bottom of your boot and add a snap to attach the fringe around the boot. IMG_6150

The fun is endless!

The fun is endless!

Make sure to check out our 10 Day Deal videos on our website for fun deals for every crafter! www.springfieldleather.com

Want entertaining how-to leather crafting videos? Check us out on YouTube!

Follow us on Facebook and Twitter for helpful tips and tricks!

Posted in How-To | Tagged , , , , , , , , , , , , , , , , , , , , , , , , , , , , , , | Leave a comment

Dyeing Leather Black

Sounds easy enough, but you may find or have found that dyeing leather black can come with complications. Streaking, fading, and pigment rub off can be common issues. Good news is that these issues are usually relatively easy to fix.

Is you are a newbie at leather crafting you may not know that when you dye leather black you HAVE TO finish it! If not you get pigment rub off. It can come off on clothes, skin, car seats, or anything else that leather article may come in contact with. If you have dyed your leather, rubbed off all the excess pigment possible, finished your leather,  and are still getting the pigment rub off, it could be because you didn’t let the leather completely dry after dyeing. This has then caused the pigment to suspend in the finish and still be on the surface. To avoid this you can wait until the dye soaks into the leather and then take a clean (lint free) cloth or rag and rub the surface of the leather. This gets the excess pigment off and readies it for finishing.

Most people find that on their first go-round with dyeing leather, whether it is black or any other color, is that it can come out streaked. It’s almost like the effect you get when taking a colored marker and try to color a big area… the color just isn’t even. This can be easily resolved by putting on another coat of black and using a black finish to aid in evening out the black.

If you are doing other colors besides black try cutting down your dye with alcohol (if you are using an alcohol dye). There is no special formula to how much you should cut it down… just remember you can always add more dye but can’t take it away!

Fiebing’s Company makes two great black finishes that work wonders for the final finish on black, Black Acrylic Resolene and Black Leather Balm.

Want to learn more about dyeing leather black as well as tips and tricks along the way check out our video, where Kevin and Rusty break down simple fixes for getting that true black color! Click Here!

Also check out our YouTube Channel for more helpful videos

Springfield Leather Company’s Helpful Leather Crafting Tips and Tricks

Posted in How-To | Tagged , , , , , , , , , , , , , , , , , , , , , , , , , , , , , , | Leave a comment

What Can Acrylic Paint Do For Your Couch?

One of the most common problems we see here at Springfield Leather is that Murphy the mutt, and Fluffy the feline, have gotten a little too comfortable on Mom and Pop’s couch. Scratches on a leather couch happen very commonly, and can possibly be an easy fix, depending on the type of leather on your couch, chair, or other upholstered item is made from, and the amount of damage that has been done. Keep in mind that this method may not be the best for large areas that have been damaged… but then again, trying this might be cheaper than getting it reupholstered in some cases!!

Step #1 Identify Your Leather:  MOST leather couches are chrome tanned leathers that have an acrylic finish. Meaning that they will have a slick clear coat over the top that can become damaged and scratched down to the bare leather… sometimes even removing the color. Conditioning and taking care of your leather couch or chair is always a good idea and can help prevent damages, but if damages on an acrylic finished leather couch have been done, then Acrylic paints might become your best friend!

ATTENTION: If your upholstery is Suede, Nubuck, or Oil Tan then Acrylic paint is not the way to go!!

Paints

Step #2 Finding the Right Color: Getting the correct color can sometimes be tricky. Most people don’t fully understand how many different shades of “brown” there actually are!! Even if your couch or upholstery isn’t brown, matching up the color usually is not a one color mix solution. Acrylic paints come in a variety of colors. Our favorite recommended paint here is Angelus’ Acrylics. They have a great line of colors, even a broad assortment of neon’s!! If Angelus doesn’t have your color, don’t panic! The cool thing about Acrylic paints is they can be mixed with one another, and since they are water based they can even be thinned down with water. This can come in handy when applying the paint to the leather.Scratch2

Step #3 Applying the Paint: If you are using the Angelus Paints you will find that they have a brush that is part of their lids. These work great if you don’t have to mix colors. If you do have to mix colors and you want to thin the paint down, get yourself a small Tupperware container and after mixing colors, a cheap children’s paint brush or even a damp (not wet) sponge will work.Fixing1

ALWAYS test a small area (one that can’t be seen if you can help it) to make sure the colors are a match and are what you are looking for.  Paint needs to be dry in order to see the true color.  If you have thinned down the paint you can work your way up with layers to affect you are looking for. The amazing thing about acrylic paint, and probably, one of the hardest to make people believe, is even if you don’t thin it down and you just apply it straight out of the bottle, it doesn’t crack or peel! (as long as the repaired surface was clean) To test this in the store, we took an old pair of cowboy boots that had seen much better days, and painted them neon pink. Then we waited for the paint to dry and proceeded to bend and pull the leather. This paint was not thinned down and stayed on perfectly!! Pretty neat, huh?FixingScratch

Distressed upholstery can tend to be a little trickier due to color variation throughout the leather. A good trick to keep in mind is to have a wet sponge nearby… if you mess up and are quick about it, most of the time you can wipe the paint off before it dries.  Since this paint is an acrylic, no top coat or finish is needed. Another great tip to keep in mind, not just with upholstered furniture, but anything leather, is to make sure and properly condition it from time to time.  Conditioning your leather is sort of like putting lotion on skin! Conditioning leather prevents it from drying out and cracking, and can prevent scratches, dirt, and other damages. ALWAYS make sure the conditioner you choose is right for your leather! If you would like to condition your leather after you paint it, all you have to do is make sure the paint is completely dry! Good Luck!ScratchFix1


Posted in How-To | Tagged , , , , , , , , , , , , , , , , , , , , , , , | Leave a comment

The Faces of Springfield Leather

If you are new to Springfield Leather Company, you may not know that on any given day, there are 4+ dogs here at our store! You also may not know that these dogs are the faces, mascots, and spokespersons for SLC. If you are familiar with SLC… well then, you have seen our dogs all over our website, advertisements, social media outlets, and of course, the store itself.

We thought it might be a good time to introduce these dogs and give you the inside scoop on what they are actually like! Some are cute and cuddly, others are more on the snarly, snippy end of the spectrum.

Kydex: Kydex is just the happiest little guy you’ll ever meet (especially for a Chihuahua). He always is running around wagging not only his tail, but his whole hind end! He is the youngest of the group of mutts, and one of the happiest at all times! Loves the kiddos, enjoys dog treats early in the morning, long naps on the shipping department packaging table, a few laps around the store now and then, and good scratches right in the middle of his back.

Kydex-On-Kydex 002

Indica: Indica is a beautiful short hair Chihuahua that is on the shy and tinkley side. She is timid with people she doesn’t know and some she does. But if she warms up to you, you can expect to give belly scratches, that is, after her tinkles. She perhaps has the best puppy eyes you have ever seen, but if you come in the store you will rarely ever see Miss Indica, as she enjoys her time in her cozy bed napping heavily on the shipping table.

IMG_9253

Tipper: Tipper is the long haired squirrel and cat chaser. High energy, high strung and always ready for action!! Unfortunately for Tipper, the squirrels and the cats usually win… But he never gets discouraged and will do battle with a snooty old cat any day of the week… And on days when Kevin and Becky (the owner and his wife) are relaxing or enjoying a nice day of planting flowers, those tend to be the days that Tipper wants to roam the neighborhood to look for his arch nemesis, the squirrel…any squirrel. Thus, leaving Kevin and Becky to aid in his rescue.  Tipper’s hobbies include being obnoxious, scaring the two house cats, and licking Patches’ ears, lips and teeth.  (yup…teeth)

IMG_6794

Sparkles: Or as Kevin likes to refer to her, Parkles. Sparkles is the diva of the group. Always looking fresh with her gorgeous flowing white hair, that never has trace of dirt or debris. She always has the fanciest collars and some of the most glamorous outfits. She enjoys strutting through the store like it’s her very own red carpet. She stays up with the current fashions and always lets you know if your outfit is out of date. PETicures are her favorite past time, and other hobbies would include not paying attention, running away, and doing almost everything in a spastically fast manner.

_MG_9207

Patches:  She is the ultimate dog momma of all dog mommas…If a dog doesn’t have a momma she will take over promptly.  Heck, even if a cat needs a momma, she’ll take them in as well! Patches believes that all children anywhere near her are under her care.  And she does a very commendable job of protecting them. Her hobbies include seeing how far she can stick her nose into your armpit and then start to snort.  She also enjoys wriggling, wedging, and schnurzeling herself as far in between you and the couch cushion that you’re leaning on as is doggly possible, while snorting constantly. She also baby sits Tipper.

IMG_8222

Bubby: Only the snippiest, snarliest dog you have ever met… unless you have food of course, then he is your best friend. Not only does he turn into your best friend whenever you have food in hand, but he also puts on a cute little show of walking in circles, puppy eyes up, tail down, looking just as cute as a button. Don’t let this trick fool you, Bubby has little dog syndrome… perhaps because he is the smallest out of all the mutts. His past times include snarling, eating, sleeping, loving on Darcie and Ed (the only two people allowed to pick him up), walking the store to check for food, eating again, biting unsuspecting customers who think he is a “cute little guy”, biting employees who get to close to his food, eating some more, and once in a while leaving a “little surprise” in the managers’ office. He thinks he is Prince Charming, but really he is King Snippy.

7-17-12 022

Neeners: Last, but certainly not least! Patches might act like the momma of all dogs BUT Neeners is the momma of almost every Chihuahua that roams Springfield Leather Company! Neeners loves attention, whether it is food, scratches, or just sleeping in someone’s office chair while they are trying to work… she LOVES it. Neeners’ favorite thing to do is smile… You can find her smiling at customers, employees, and even the UPS man… only issue is Neeners may not have the best smile… it’s a bit snaggelty and perhaps a few teeth are missing here and there. But that doesn’t stop her! Nope, chances are if you ever see Neeners in the store she will be grinning from ear to ear, and probably making this awkward contented grunting sound as well!!

7-11-12 003

Posted in About Us | Tagged , , , , , , , , | Leave a comment

Made in the USA…

It’s an exciting time here at Springfield Leather… Well actually it’s always an exciting time here. You never know what the day will bring. Dogs are scurrying, employees scuttling, and managers… well managing.

What’s exciting right now is that Springfield Leather is making an announcement!!! On the edge of your seat now aren’t you??

We are happy to announce that we will be distributors for the Famous Horween Leather! We are very proud to offer their line of Chromexcel. This leather is everything it is made out to be and more… and with a name like Horween behind it, how can it not be?

bjkhjkghjkhjkhjk

Never heard of Horween? You’re missing out! Here is a little blurb that might make you fall in love with their leathers like we did…

Made in the USA… it’s a phrase that many Americans take pride in. In the leather world it means one thing… quality.

With only a handful of tanneries in the US today, they must be able to stand out from the rest of the world. Many fine leathers come from South American Tanneries and others from Italy, so how does the US compete?

By 1850 there were almost 7,000 different tanneries in the United States, in 1978 there were 250, today with the change of labor cost and EPA regulations there are around 10… BUT one tannery in particular keeps the tradition of both quality and craftsmanship alive.

Horween Leather, located in Chicago, Illinois, has been tanning hides since 1905. Chicago used to be filled with tanneries, almost 40 to be exact. Today only one single tannery survives, and that is non-other than Horween.

Horween_Chicago_13

So why Horween, what made it survive through all the changes, and what makes it stand out as one of the world’s leaders in the leather industry?

Two words: Craftsmanship and Quality

While most tanneries run on the “get it done and get it out the door” philosophy, things at Horween run a little slower, and more time and care is taking into each product. Many of Horween’s method havn’t changed from the 1900s, and with this being a family business, things are done on a personal level.

Horween was started by Isidore Horween in 1905. Isidore came to the US from Ukraine and after working for a time in another tannery and being unsatisfied with the products, he decided to start his own. Today Horween is run by the 4th and 5th generations of the family, “Skip” Horween and his son Nick Horween.

horween_chicago_23

Many of Horween’s products are still done using the same methods as in the 1900s. Skilled craftsman take the leather from the beginning to the finished product. This is what truly sets Horween apart from other tanneries. Can you believe that one of Horweens products, the cordovan shell, takes 6 months to make!!

Once again, Springfield Leather is very proud to announce that we will be a distributor for the Famous Horween Leather. We are excited and honored to be able to uphold the Horween name!! We will be adding more lines as they become available!

HORWEEN

For more information on Horween’s Leather, products, and history visit www.Horween.com 

  Interested in purchasing some Famous Horween Leather? Check out our website or contact us at www.springfieldleather.com.

Posted in Leather Education | Tagged , , , , , , , , , , , , , , , , , , | Leave a comment

How to Handsew Leather

Although any type of leather can be hand sewed, the leather of choice for these instructions will be using vegetable tanned leather.

Picture1

Vegetable tanned leather has been tanned with natural agents, such as wood and vegetable oils. The end product is a firm but flexible leather that can be molded to shape, dyed and stained to color, or tooled and stamped with pictures and designs.

Vegetable tanned leather can be derived from any animal hide: cow, horse, lamb, goat, and pig.

Tools needed will be:

  • Large Eye Needle

Large eyes are convenient when working with waxed thread

  • Linen Waxed Thread

Waxed thread is used when stitching leather to help protect and aid the thread from fraying or breaking

  • Stitching Awl

For making holes for each stitch

  • Stitching Groover

Used for channeling a groove into leather allowing the thread to sit within

  • Stitching Wheel

The stitching wheel is used to keep spacing correct in between each individual stitch

  • Contact Cement

Since leather will flex and bend, it is important to use contact cement to adhere leather. Contact cement stays flexible and contours with movement. In this manual we will be using  Masters Contact Cement™.

  • Vegetable Tanned Leather

Two pieces of small cowhide rectangle shapes

 Picture3

To begin your hand sewing project you need to prepare your needle and thread

1. Pull two arms lengths (or approximately 2 yards) off your spool of thread. Pulling off to much thread can be difficult to work with and become tangled while your working. Don’t worry about not having enough, we will address the issue of running out later.

2. Each end of your thread will get a needle

3. Placing the thread through the eye and pull out about an inchPicture44. Pierce the thread with the needle, as shown

Picture5

5. Push thread up on needle to the eye

Picture6

6. Hold the needle and pull the long end of the thread over the eye to make a locking end           *Repeat steps 1-6 for other needle 

Preparing the Leather

1. Place both pieces of leather rough side up on the work space

2. Apply THIN coats of glue to each piece and let COMPLETELY dry

3. Then apply another thin coat to each piece and right before they are completely dry place together.

This allows for a strong bond between the glue and the leather to form, properly holding your leather in place.

Grooving your Leather

1. Taking your saddle groover adjust the length of the arm to fit  how far away you wish your stitches to be from the edge of the leather. This can be done by loosing the cylinder and pulling the arm in out to desired length.

Picture7                                                                                                Picture8

2. After a comfortable length is determined, tighten the cylinder back down

3. Place the arm with the hole end on the leather

Picture9

4. Firmly push down and pull towards you, this will create a straight channel next to the edge of the leather

Picture10

5. Continue by going all the way around your project

Grooving also allows the thread to set off the surface of the leather, protecting it from          being rubbed, cut, or worn.

Marking Stitches

1. Dampen leather with water along the channels, this allows leather to take the stitch marks

2.  Keeping within the channel run the stitching wheel around the project

Picture11

3. Continue completely around project until finish

 Picture12

Preparing for Stitching

1. Start by taking your stitching awl and stab four holes where the stitching marks are places. Keep the blade of the awl the same direction throughout the entire project. This will allow for a more uniform stitch. Since leather shrinks and holes tend to tighten back up, we will only be stabbing four holes at a time. Picture13

2.  Take your thread with needles on both ends, and place one needle through the hole in which you wish to begin.

Picture14

3.  Pull thread through and make it even on both sides of the leather, like you would shoestrings.

Picture15

Starting your stitch

1. Starting with the right needle, push it through the hole above the hole your thread is currently in

Picture16

2. Next take the left needle and place it through the same hole you push the right throughPicture17

3. Pull both sides of the thread tight. It is important to remember how you pulled the thread because you will need to do this every time. This helps keep the stitches uniform.

Picture18

 Continue on by repeating steps 1-3, remembering to pull your thread tight and stabbing four holes at a time to stitch though

Running out of Thread

Don’t Panic!

1. Cut off needles and tie thread together on top of the edge of your project

Picture19

2. Prepare new needle and thread the same as before

3. Place one needle through your third stitch back and make thread even on both sides Picture204. Begin stitching again, just like before but going over your four stitches. Don’t worry about the tied thread, we will deal with it at the end

Picture21

5. Continue stitching, weaving the needles and thread in and out, just like before.

Ending Your Stitching

YOUR ALMOST THERE!!

1. When you get to the end of your project and your stitches meet up, you will need to continue to sew over where you started 3-4 stitches. This will allow to the thread to bind within itself and no tying is required

.Picture22Picture23Picture24

2. Cut each end of the thread off close to the stitch and burn the end with a lighter. This will cause the wax and the thread to ball up

Picture25

3. Take your finger and push this ball while still warm into the stitch. CAUTION: Wax maybe hot!

4. If you had areas where you ran out of thread and knotted them on the edge of the leather take scissors and cut these off close to the stitch also burn the ends and pushing them into the stitch.

And… YOUR DONE!!!

Posted in How-To | Tagged , , , , , , , , , , , , | 1 Comment

Easy-To-Do Paracord Bracelet Instructions

Thought we would have a little fun with this post and give you some easy-to-do colored instructions on how to make a paracord bracelet! If you are looking for supplies to make the bracelet you can find them on our website!

www.springfieldleather.com

Enjoy!!

1 2 3 4 5 6 7 8 9 10 11 12 13 14 15 16 17 18 19 20 21 22 23 24

Posted in How-To | Tagged , , , , , , , , , , | 2 Comments

What we learned out on the road…

Besides that, Kevin (the owner), is a master flute player in hotel stair wells, we also learned a tremendous amount of information this year at the WESA convention in wonderful Denver, Colorado.
What is WESA? It stands for Western & English Sales Association. It’s a trade show where wholesalers can meet with suppliers, looking at and learning about new products, as well as getting insight on the ever changing trends and market conditions of the leather world.WESA6      AND BOY… I would have to say that this trip was a success!
It’s not a big secret that leather prices have steadily risen in the past years, and this hasn’t stopped yet. So, why the price incline? Two big names you might have heard of… China and India. With China and India’s middle class growing, the demand for leather goods also grows… Little Johnny’s parents can now afford to buy him that pair of Nike shoes. Another cause of the price increases is the lingering drought here in the United States. Poor cattle producing conditions, causing herd sell off and poor hide production.WESA
On the brighter side of things we learned that just because hide prices have gone up, it hasn’t caused the leather crafting industry to die! More leather crafters, saddle companies, and holster makers have changed gears and gotten frugal and smarter. Crafters are buying quality instead of cheap… causing Mexican tanneries to produce higher quality leather to compete with the already quality leather being produced in the United States. Needless to say, the consumer trend seemed to be geared toward “Quality USA Leather”.WESA3
Another trend that was seen and heard from almost all leather vendors was “gun leather”. With gun sales rising in the country, more and more people are looking for holsters and slings and leather accessories for their guns. That being said, USA leathers such as Hermann Oak, Horween, and Wickett & Craig have been in very high demand. Our sales of Hermann Oak and Horween Leathers have tripled in the past 12 months!WESA5
One thing that stood out to all of us who attended the show was a song that was sung over and over at the different booths we visited… and that was EDUCATION!! Vendors were stressing about how important it has been to educate their consumer. Where does this leather come from? What is the tanning process? Why is this leather cheaper or more expensive than that leather?
WESA2

At SLC it is part of our basic business model to provide our customers with education and knowledge, to the end that they can be successful in whatever form of leather craft that they are pursuing. It is our hope that this blog will continue on these lines.

Posted in Leather Education | Tagged , , , , , , , , , , , , , , , , , , , | Leave a comment

What is Springfield Leather Company

Springfield Leather Company is, well… an interesting place to say the least.  Located in good ol’ Springfield Missouri… We aren’t exactly your average retail store. With 2 main managers, 45 employees, 5+ Chihuahuas, and 1 man that acts as the glue to all the chaos… everyday here is an exciting story.

Vegrolls

Leather is our main business. Cow, goat, pig, horse, caiman, elephant, ostrich, shark, rabbit, squirrel… ok maybe not squirrel, granted we have had a live one in the store before… that’s a story for another time. We do dabble in other ventures, offering beads, home décor, and all the hardware for bags, saddles, holsters, and anything else you can dream up.

178166_523833137629135_751339823_o

The master behind the madness is none other than Mr. Kevin Hopkins (the man that’s the glue). Kevin was a Tandy store manager, and when Tandy was going through some changes in 2000, Kevin bought the store. Since then SLC has gone through 2 expansions and another is in the works. Kevin’s passion for his customers has made the company what it is today. There are no corporate rules here, no black and white answers. Each customer is treated as an individual, because each customer’s needs are different.

wharhouse

We intend this blog to be fun and educational. It is our hope that if you are a professional leather crafter, or just want to dip your toes in here and there, that this blog will be of value to you.

Coyote

To see more pictures of the store, or to look at more of what we are all about, make sure to visit our other good stuff!

www.springfieldleather.com

Facebook

YouTube

Posted in About Us | Tagged , , , , , , , , , , , , , , | 3 Comments